DocMoto
Server
A guide to restoring DocMoto
This article is the companion to A guide to backing up DocMoto
You should follow these instructions if you want to migrate a DocMoto server or you have had crash of your primary machine and want to restore DocMoto to a new server.
For clarity the original or primary machine will be described as the "source" computer, and the new machine where you are restoring your DocMoto server will be described as the "target" computer.
Note. If you are restoring a DocMoto server to locate deleted files you must NEVER restore a backup over an existing live server. Always create a temporary DocMoto server, restore to that and copy the missing files to the live DocMoto server.
Restore Overview
All DocMoto servers store their meta data in a PostgreSQL database called docmoto and the physical files in a folder on the server's hard drive. The meta data store we describe as the "data store". The physical file folder we describe as the "file store". Any backup and restore operation must correctly handle both elements.
If you are using the DocMoto Backup Utility as described in the article A guide to backing up DocMoto then both the data store and file store are being backed up correctly to a single location defined by the "Backup Directory" field in the Backup Utility. The backup directory contains a single folder called archive.
If you are not using the DocMoto backup utility but are taking a backup of both the file store and data store then these instructions will also broadly apply.
Tools for the job
-
pgAdmin III On the target computer you will require access to the PostgreSQL database. We recommend that you use the pgAdmin III.app which is usually in the PostgreSQL folder within "Applications". If it is not present it can be downloaded from http://www.pgadmin.org.
-
Terminal All Macs have a terminal app. You will find it in Applications under Utilities. It is often useful to add Terminal to the Doc as it is used quite heavily during a restore. Terminal allows you direct access to the underlying bare bones of a Mac.
What's in the archive folder
The archive folder produced by the Backup Utility contains the following essential items.
- Content - DocMoto data store backup.
- docmoto_x.pg_dump - DocMoto database backup, where “x” is the day of the week. Monday = 1, Tuesday = 2, Wednesday = 3, Thursday = 4, Friday = 5, Saturday = 6 and Sunday = 7.
- docmoto.searchkit.db - search index, specifically for content searching.
- tmp - used internally by the Backup Utility.
Restore Steps
A restore consists of the following basic steps
- Install a fresh copy of the DocMoto server on the target computer.
- Rename the archive folder on the target computer and replace it with the archive folder from the source computer (or your backup).
- Adjust the "ownership" of the replacement archive folder on the target computer.
- Rename the docmoto database within PostgreSQL, create a new docmoto database and restore the database dump from the archive folder.
- Restart the DocMoto server on the target computer.
- License the DocMoto server on the target computer.
- Tidy up.
Step 1 - Installing a fresh copy of the DocMoto server on the target computer
Login into the CHLSoftware website and download a copy of the DocMotoServer.dmg file.
Install the software on the target computer then stop the DocMoto server by opening "System Preferences", clicking on the "DocMoto Server" item in the "Other" category and selecting "Stop Server".
Hint: It also makes sense to install a copy of the DocMotoClient as this will enable you to access the new DocMoto server directly on the target machine.
Step 2 - Rename the archive folder and Replace it with the backup
When a DocMoto server is installed it creates an archive folder of its own. We need to replace this with the archive folder from the backup (or source computer).
By default the archive folder is hidden, so to rename it open terminal and login as a "super-user" by typing the following:
sudo -s
Press return and you will be prompted for a password. Hint: The password is the same one you use when installing new software.
Note: Do not close your terminal as this will remove the super user status. If you do close the terminal you will need to re-enter sudo -s when you re-open it.
Once logged in you need to navigate to the location of the archive folder by typing:
cd /var/opt/docmoto
To list the contents of the hidden docmoto folder type the following command:
ls -la
Amongst the list you should see an entry for archive. We need to rename it (once the restore is complete we can delete this folder). Rename by typing:
mv archive archive_old
Re-run the list command and check you have a folder called archive_old and no folder called archive.
We now need to copy the contents of the archive folder obtained from the backup into /var/opt/docmoto.
Start by copying the backup archive folder from the source machine (or your backup device) into your home directory on the target server. We just place it here as a handy location to access its contents. Once the restore is complete this folder can be removed.
Now we need to copy the archive folder into the /var/opt/docmoto folder by typing the following in terminal:
cd
Followed by:
cp -r -p archive /var/opt/docmoto
Run another listing of the contents of /var/opt/docmoto and you should see a folder called archive.
Leave the copy of the archive folder you placed in your home directory, we will need this later on when we come to restore the database.
Step 3 - Adjust the ownership of the replacement archive
You need to ensure that the ownership of the archive folder is correct. To achieve this type the following in the terminal.
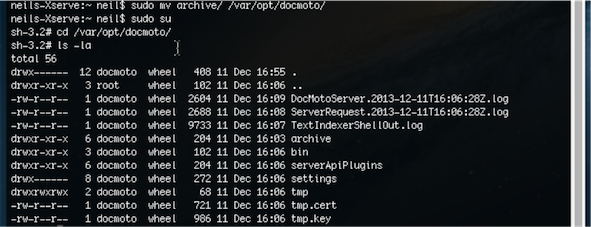
chown -R docmoto:wheel /var/opt/docmoto/archive
Re-run the listing of /var/opt/docmoto and you should see something similar to the screenshot below.
Step 4 - Rename the docmoto database and create a new one
Open pgAdmin. You will be asked to enter the password for the user "postgres", assuming your PostgreSQL installation has not been modified this password will be the default of "postgres".
Once logged into PostgreSQL expand the left hand tree view and work down to the "docmoto" database within "Databases".
We will now rename this database (it can be remove later if the restore is successful). To rename the database highlight the docmoto database, right mouse click, select Properties and change the "Name" field value from docmoto to docmoto_old. Then press OK.
We now need to create a new docmoto database. To do this highlight the Databases entry in the tree view, right mouse click and select "New Database".
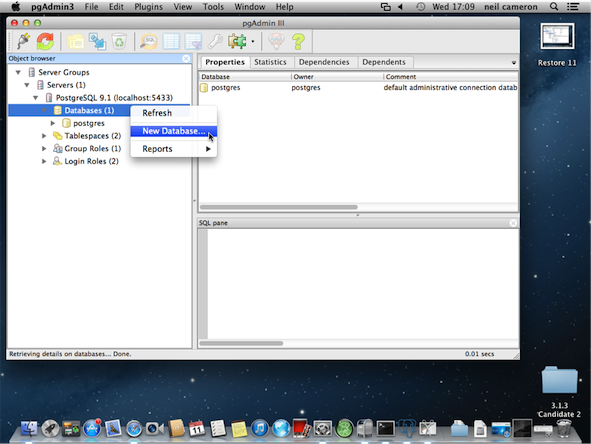
In the Name field enter docmoto. In the Owner field you must set the owner to the user docmoto by choosing the entry "docmoto" from the drop down list. Once done press OK.
Leave pgAdmin open as we will return to it shortly.
Identifying the correct database backup file to restore
Before attempting to restore the database backup we need to check that we are restoring the correct backup.
In Finder open the archive folder you copied into your home directory. We need to identify the most recent database backup file.
All database backup files are of the form docmoto_x.pg_dump, where x is a number 1-7. To find the most recent simply sort the files by "Date Modified", the most recent will be listed upper most. Make a note of it, this is the file we will be use to restore the database.
Now return to pgAdmin, navigate to the docmoto database created earlier, highlight it, right mouse click and select "Restore".
With the Restore dialog open check that the Format field has a value "Custom or Tar". Against the FileName field navigate to the docmoto_x.pg_dump identified in the previous step. Hint: To see the correct file make sure that "Enable option" is set to All files(*) on the file selection dialog.
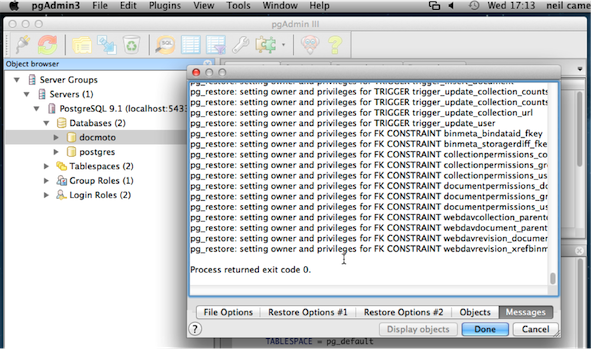
Once complete the "Restore" button will become enabled. Press it and restore the data. If all goes well you should see a message at the bottom "Process returned exit code 0".
Step 6 Restarting the DocMoto server
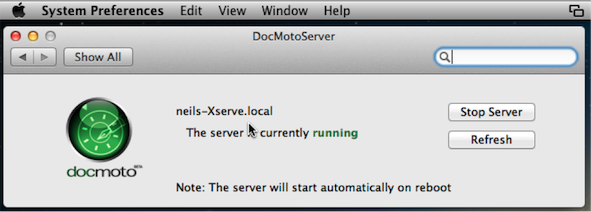
The restore process is now complete. To restart the DocMoto server go back to the "DocMoto Server" under "System Preferences" and select "Start Server".
All being well the server should start and you will see the message "The server is currently running".
Step 7 Re-Licensing the DocMoto Server
If you attempt to log into your target server you will get a message to say the server is unlicensed.
This is because DocMoto server licenses are machine specific and are not therefore transferrable.
In this state you will be able to access your files as unlicensed servers operate in read-only mode, which means you can get up and running in an emergency situation.
To obtain a valid license for your target machine you will need to contact CHLSoftware.
To log into the DocMoto server on the target machine you will need to adjust the "Server Address" field in your connection details to the IP address or network name of the target computer.
The IP address can always be obtained by typing the following from the terminal on the target machine.
ifconfig | grep inet
Alternatively look in "System Preferences" under the "Network" section.
When performing a restore all the user names and passwords are restored. So once you have adjusted the "Server Address" you should be able to log into the new DocMoto server with the same user name and password as on the source DocMoto server.
Step 8 Final tidy up
Assuming you can now log in and all the data is correct you can remove the temporary files and folders created during the restore. In particular the "archive" folder in your home directory, the file archive_old in /var/opt/docmoto and the database docmoto_old.
Finally you should reset your backup procedures so they are now backing up your new DocMoto server.